쑤쑤_CS 기록장
Chapter 5: Digging Deeper into Turi Create 본문
5단원 에서는 SqueezeNet base model 을 이용해서 snack classifier를 train하고, 그 결과를 evaluate 하기 위한 다른 방법을 알아본다.
use the SqueezeNet base model to train the snacks classifier, then explore more ways to evaluate its results.
* Getting started
지난 단원의 turienv 환경을 계속 사용한다. Jupyter notebook, snacks dataset 를 이용한다.
* Transfer learning with SqueezeNet
cells 들을 하나 하나 수행한다.
그 결과,
지난 단원과 비교해서 feature extraction 이 빠르다.
This is because SqueezeNet extracts only 1000 features from 227×227 pixel images, compared with VisionFeaturePrint_Screen’s 2,048 features from 299×299 images.
training, validation accuracies 는 아쉬운 부분이다.
Create ML 처럼, Turi 는 training data에서 5%를 랜덤으로 validation data로 이용한다.
so validation accuracies can vary quite a bit between training runs.

* Getting individual predictions
지금까지는 4단원에서 한 내용을 복습했다.
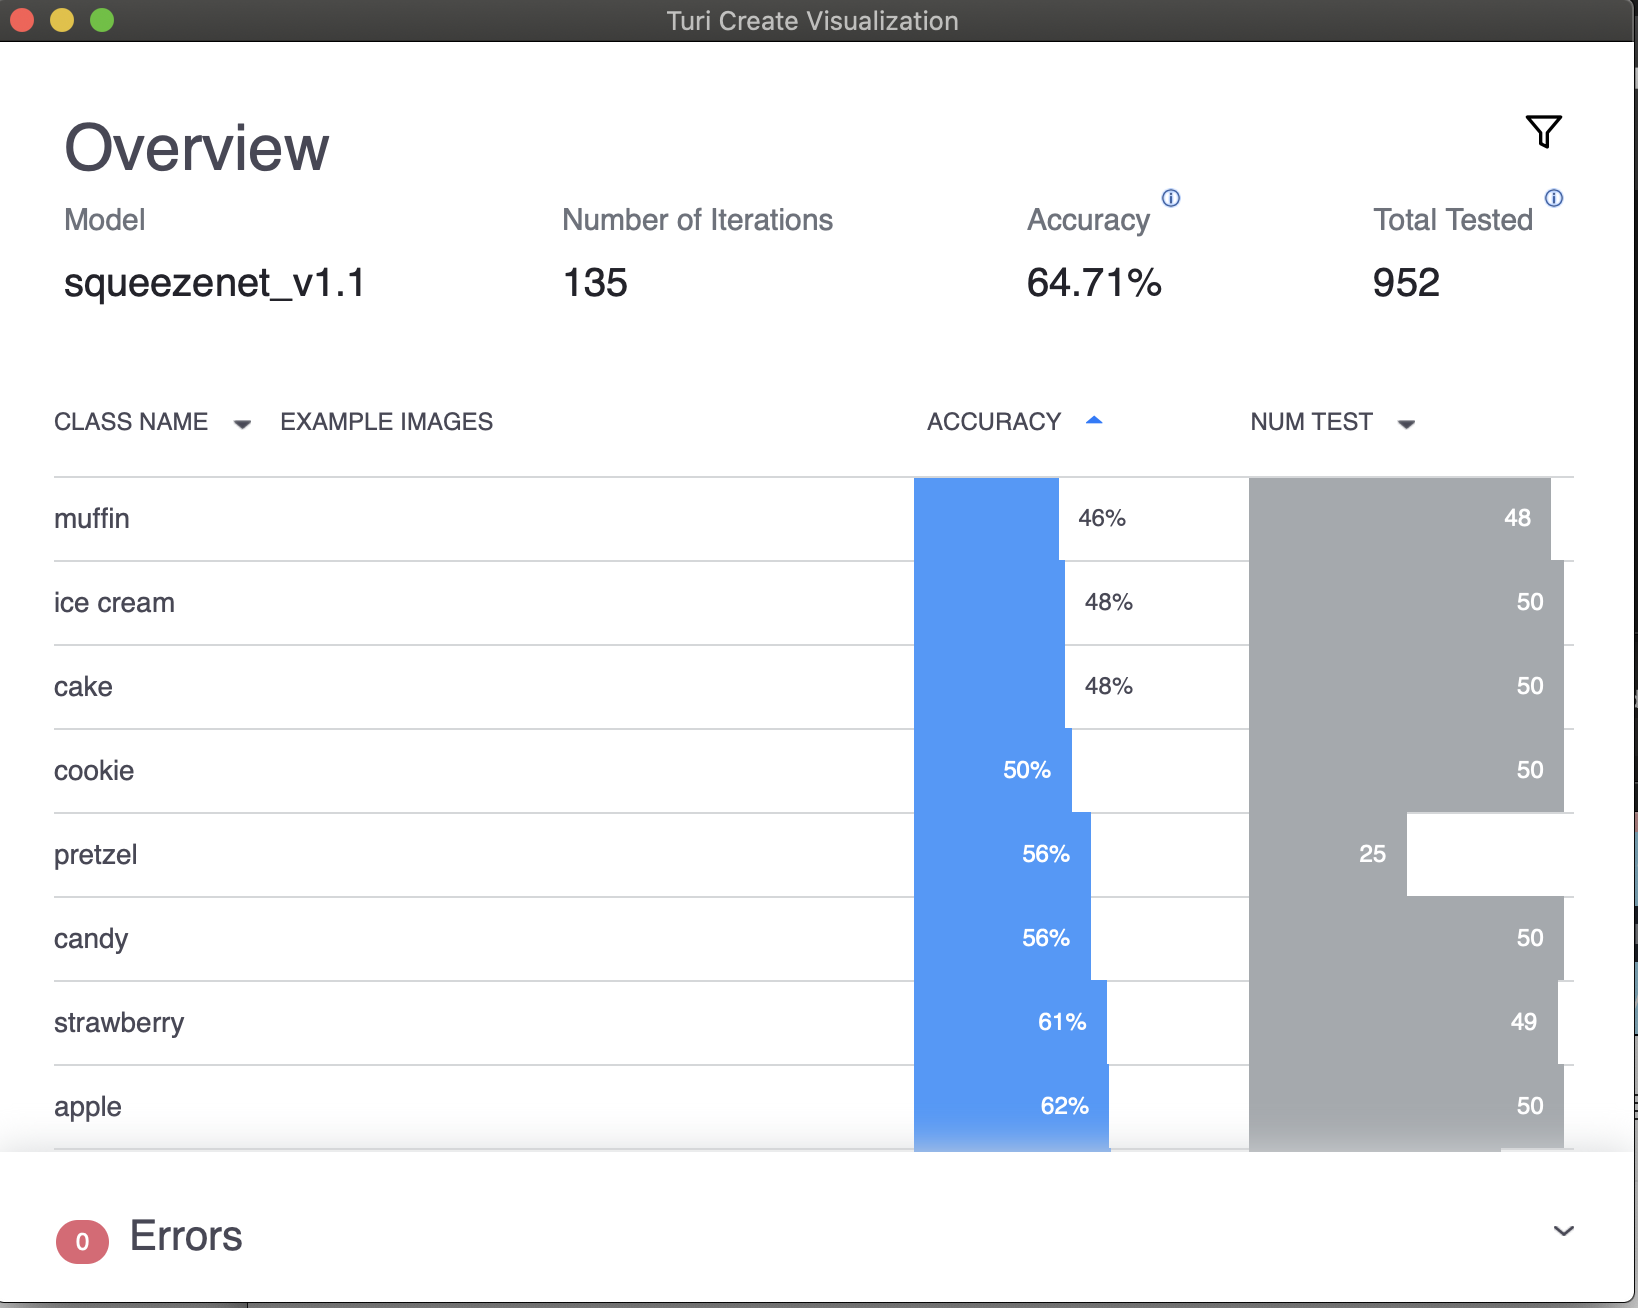
evaluate() metrics는 모델의 전체 정확도에 대한 아이디어를 주지만, individual predictions에 대해 훨씬 많은 정보를 얻을 수 있다. 모델이 잘못되었지만 예측 정확도가 높을 때가 특히 더 흥미롭다. 모델의 어디 부분이 잘못되었는지는 training dataset의 improve를 위해서 도움 될 것이다.
what's going on 을 알기 위해 metrics.exlopre() 를 입력한다.
* Predicting and classifying
Turi는 evaluate() 하기 위한 다른 기능들을 갖고 있다.
model.predict(test_data) 를 수행하면, test set의 각 이미지에 대한 prediction 값을 보여준다.
이때 두번째 이미지인 test_data[4]이 orange 라고 결과가 나왔으므로 확인해본다.
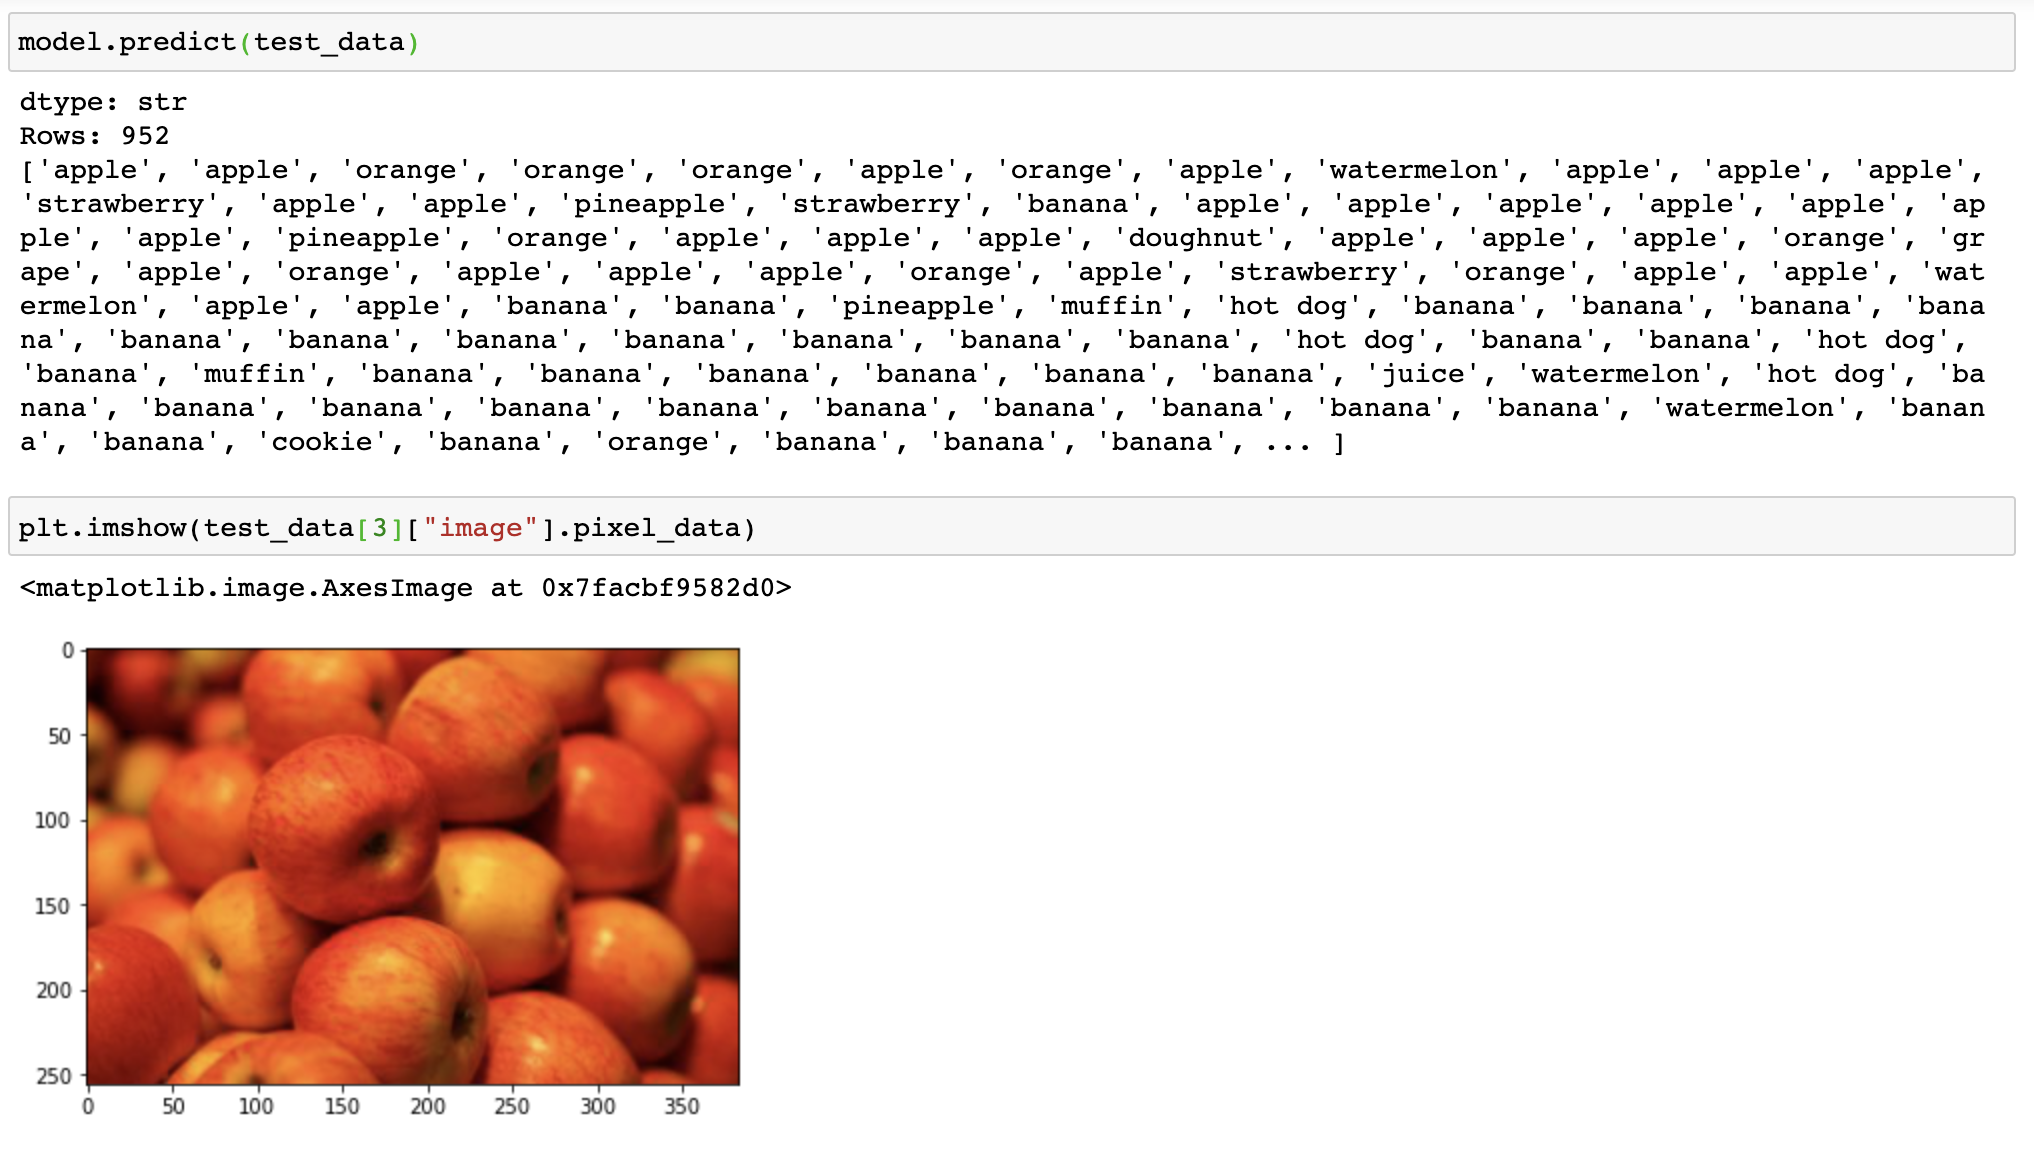
모델이 정확하지 않은 것 같다.
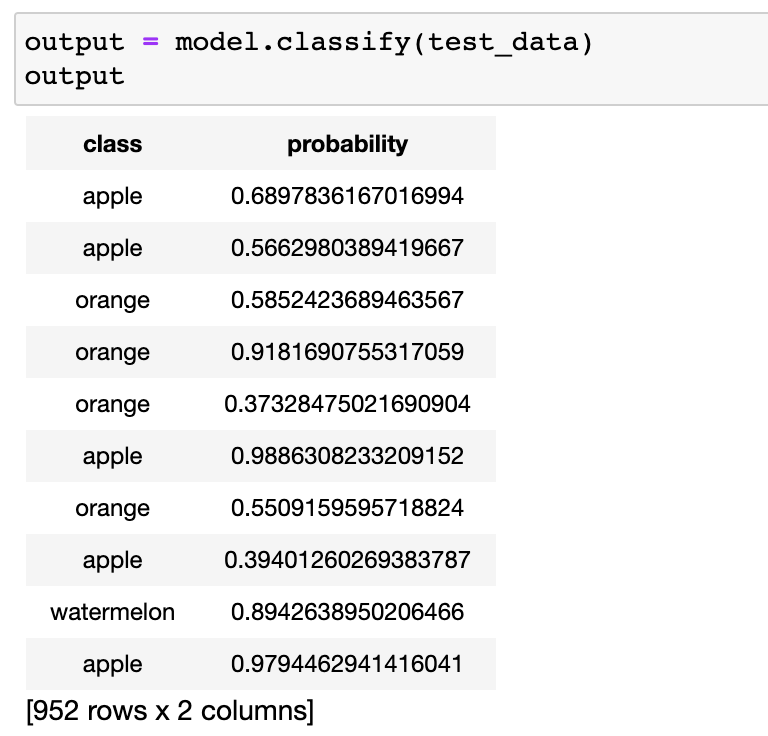
images that correspond to each prediction 에 대해 보는 것은 도움이 된다.
imgs_with_pred = test_data.add_columns(output)
imgs_with_pred.explore()
를 입력하면 오류가 난다.
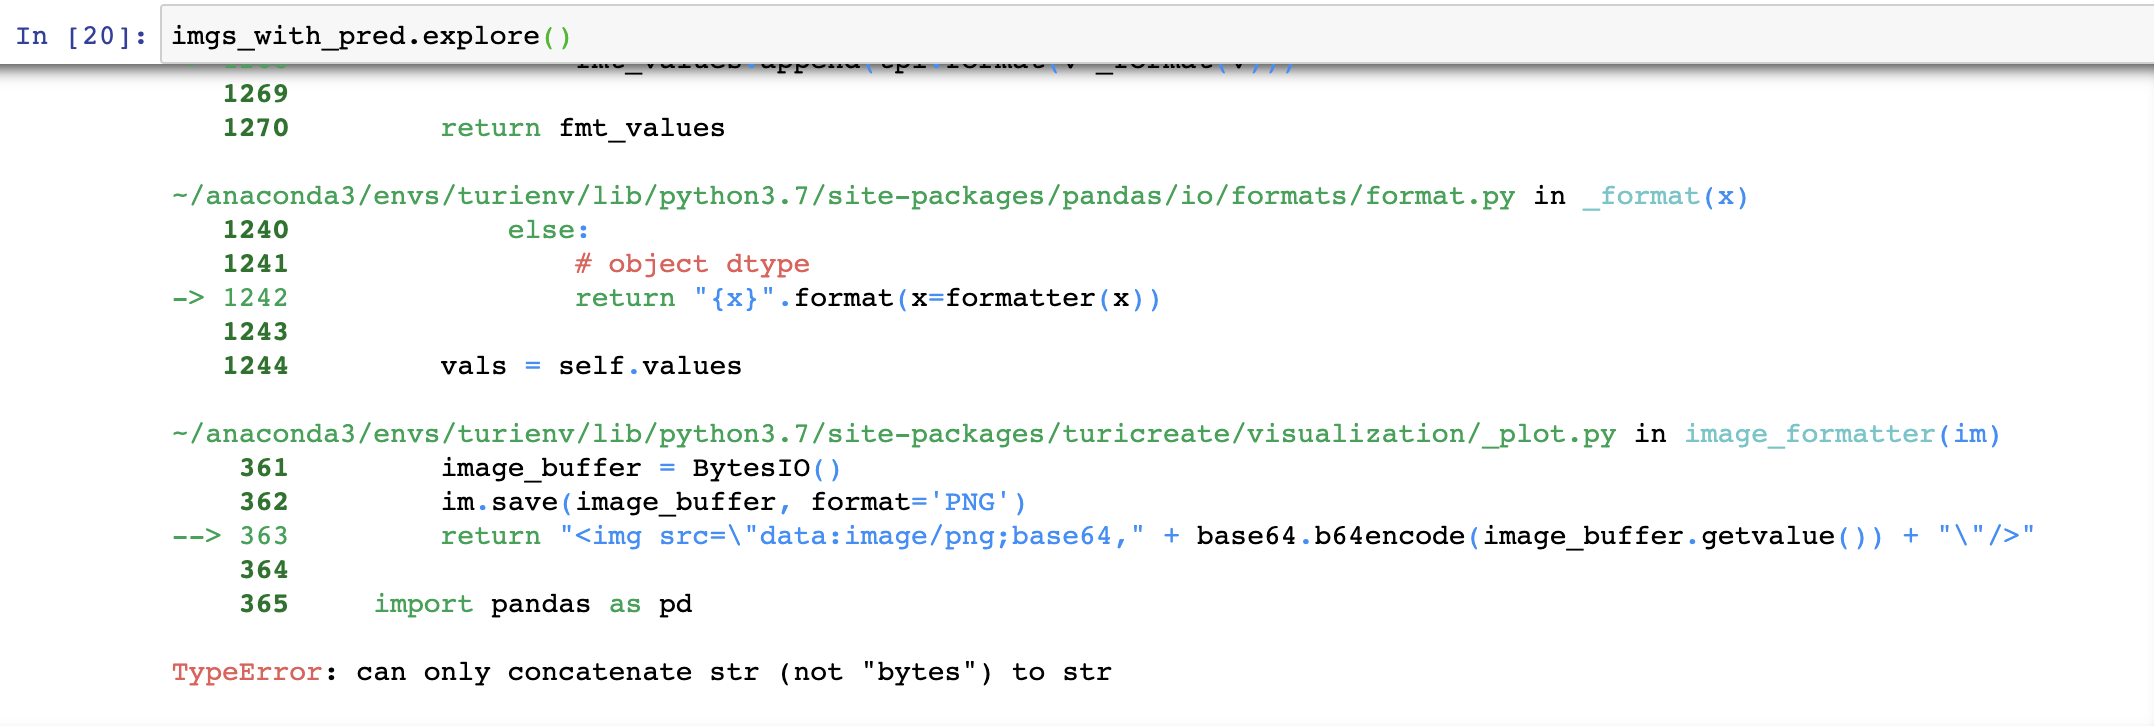
이부분에 대해서는 다음 글에 자세하게 설명해보자.
실습을 마저 진행하면,
label column은 올바른 class이고, class는 모델의 예측 정확도가 가장 높은 값 이다.
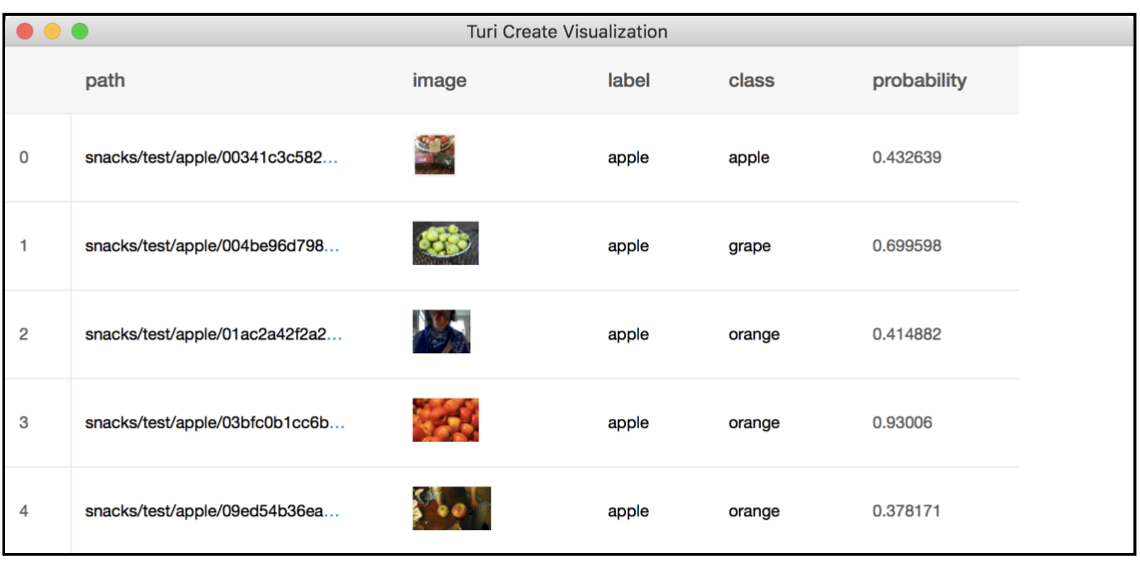
이때 눈여겨 볼 데이터는 두 라델이 다른데 probability 가 높은 이미지 이다.
다음 명령어를 통해 rows with high-probability wrong prediction 만을 filter한다.
The first term selects the rows whose probability column has a value greater than 90%, the second term selects the rows where the label and class columns are not the same.
The true label of the highlighted image is “strawberry,” but the model is 97% confident it’s “juice,” probably because the glass of milk(?) is much larger than the strawberries.
model이 이런 confident-but wrong predictions를 어떻게 보는지 알 수 있다.
* Sorting the prediction prababilities
Turi Create’s predict() method can also give you the probability distribution for each image.
You add the optional argument output_type to get the probability vector for each image — the predicted probability for each of the 20 classes. Then let’s look at the second image again, but now display all of the probabilities, not just the top one:
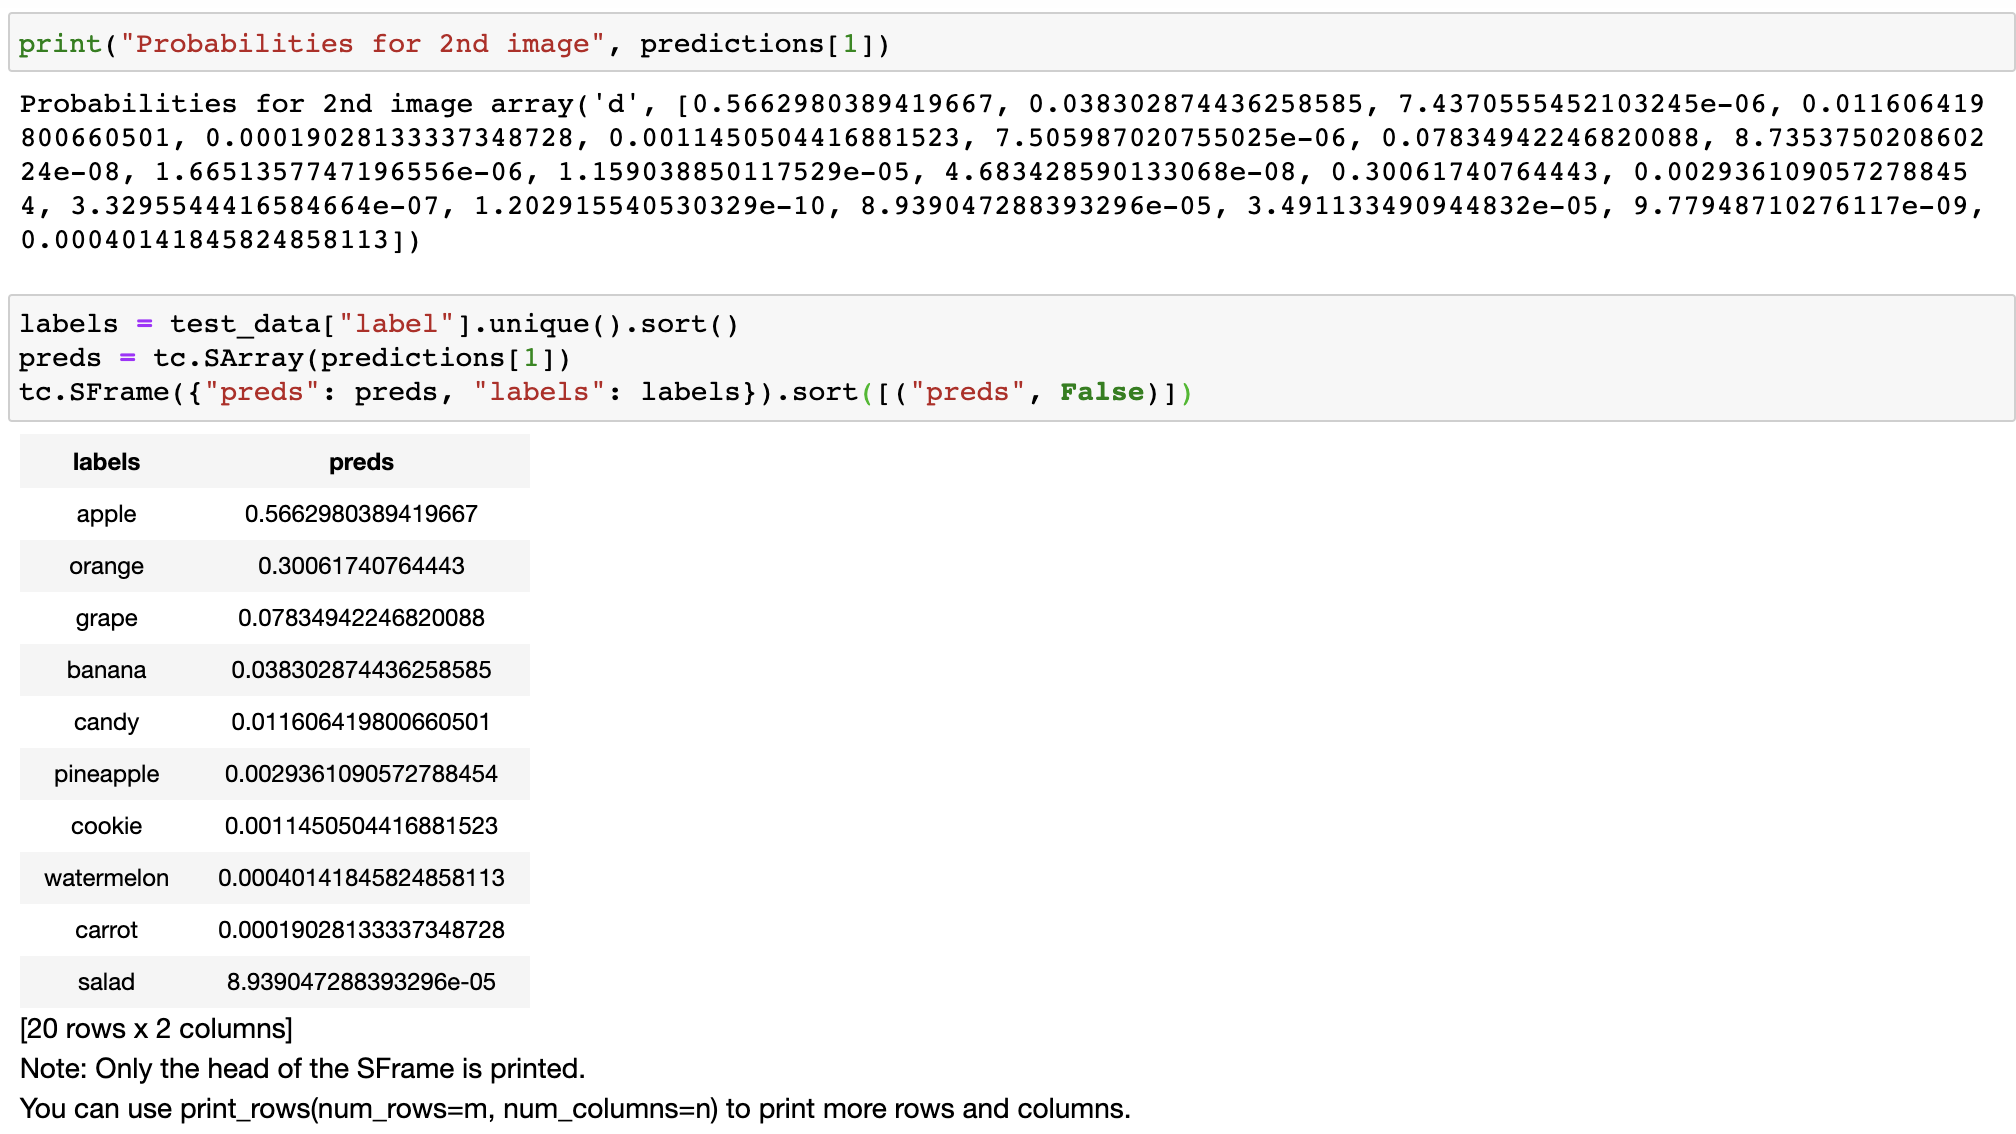
So the model does at least give 20% confidence to “apple.” Top-three or top-five accuracy is a fairer metric for a dataset whose images can contain multiple objects.
* Using a fixed validation set
정확도에 대해 더 reliable estimates 한 것을 위해서 own validation set을 사용해보자.
You can now train the model with a few different configuration settings, also known as the hyperparameters, and compare the results to determine which settings work best.
val 폴더에 있는 snacks dataset을 이용한다. 이미지들을 SFrame에 load하고 이전과 같은 코드를 사용한다.
own validation set으로 model을 train 한다.
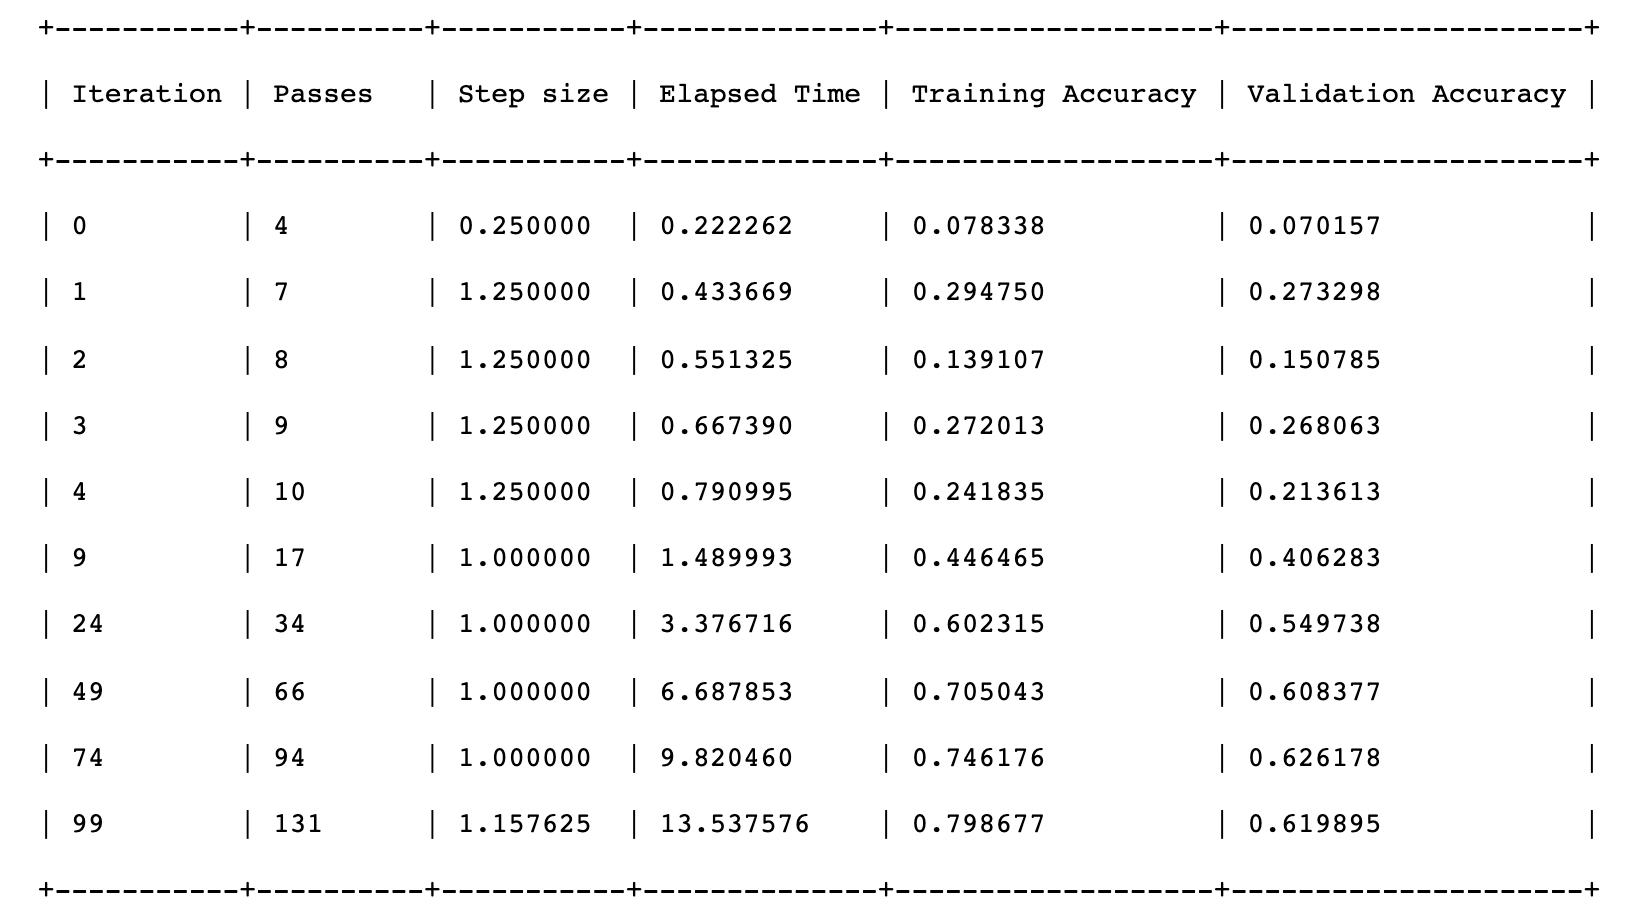
* Increasing max iterations
iteation 값을 100에서 200으로 변경하여 다시 train을 시켜본다.
max_iterations setting은 모델이 얼마 동안 training 할 것인지를 결정한다.
+ iteration 이란?
: The number of passes to complete one epoch.
- indicates the number of times the algorithm's parameters are updated.
- 반복(iteration) : 학습 중에 모델의 가중치를 한 번 업데이트하는 작업. 반복은 데이터 배치 하나의 손실을 기준으로 매개변수의 경사를 계산하는 작업으로 이루어진다.
+ epoch 이란?
: One Epoch is when an ENTIRE dataset is passed forward and backward through the neural network only ONCE.
iteration 수는 hyperparameter의 예시이다.
The things that the model learns from the training data are called the “parameters” or learned parameters.
The things you configure by hand, which don’t get changed by training, are therefore the “hyperparameters.”
The hyperparameters tell the model how to learn, while the training data tells the model what to learn, and the parameters describe that which has actually been learned.
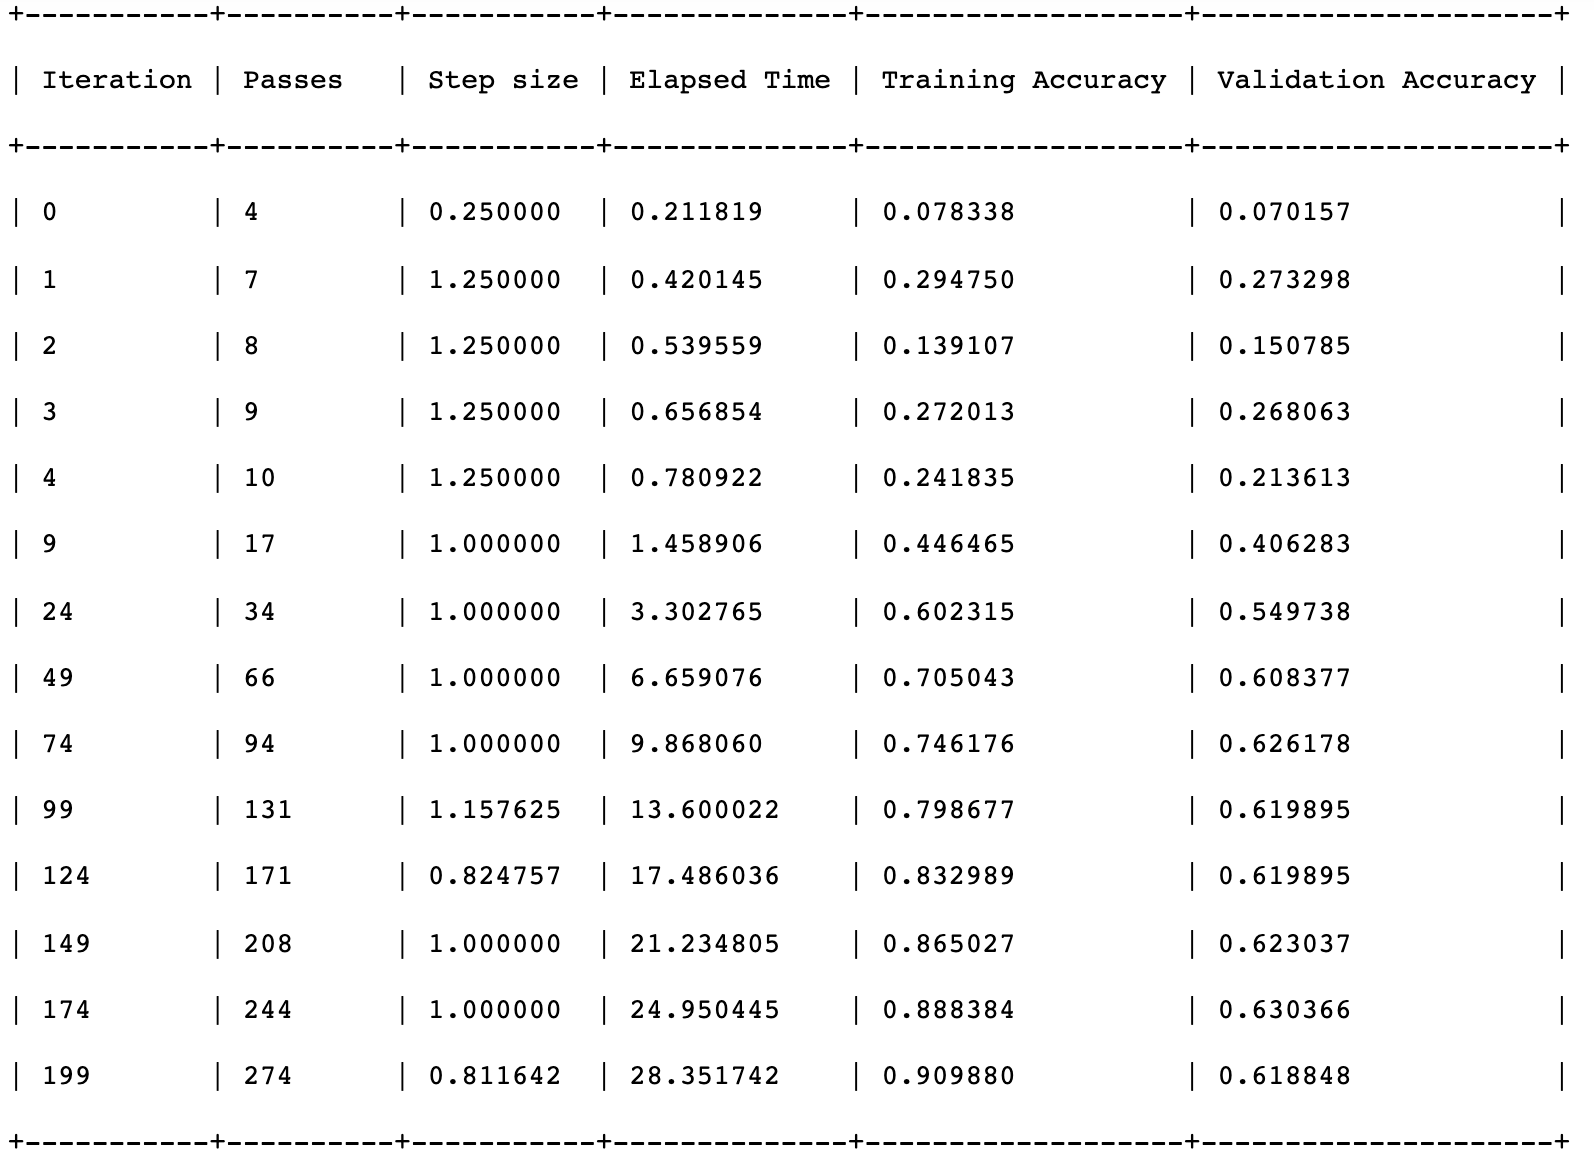
training accurary 가 이제 90%이다.
you shouldn’t put too much faith in the training accuracy by itself. 를 기억해야 한다.
More important is the validation accuracy.
The sweet spot for this model seems to be somewhere around 150 iterations where it gets a validation accuracy of 63.7%. If you train for longer, the validation accuracy starts to drop and the model becomes worse, even though the training accuracy will slowly keep improving. A classic sign of overfitting.
모델을 평가하기 위해 usual code 를 test set 실행시켜 본다.
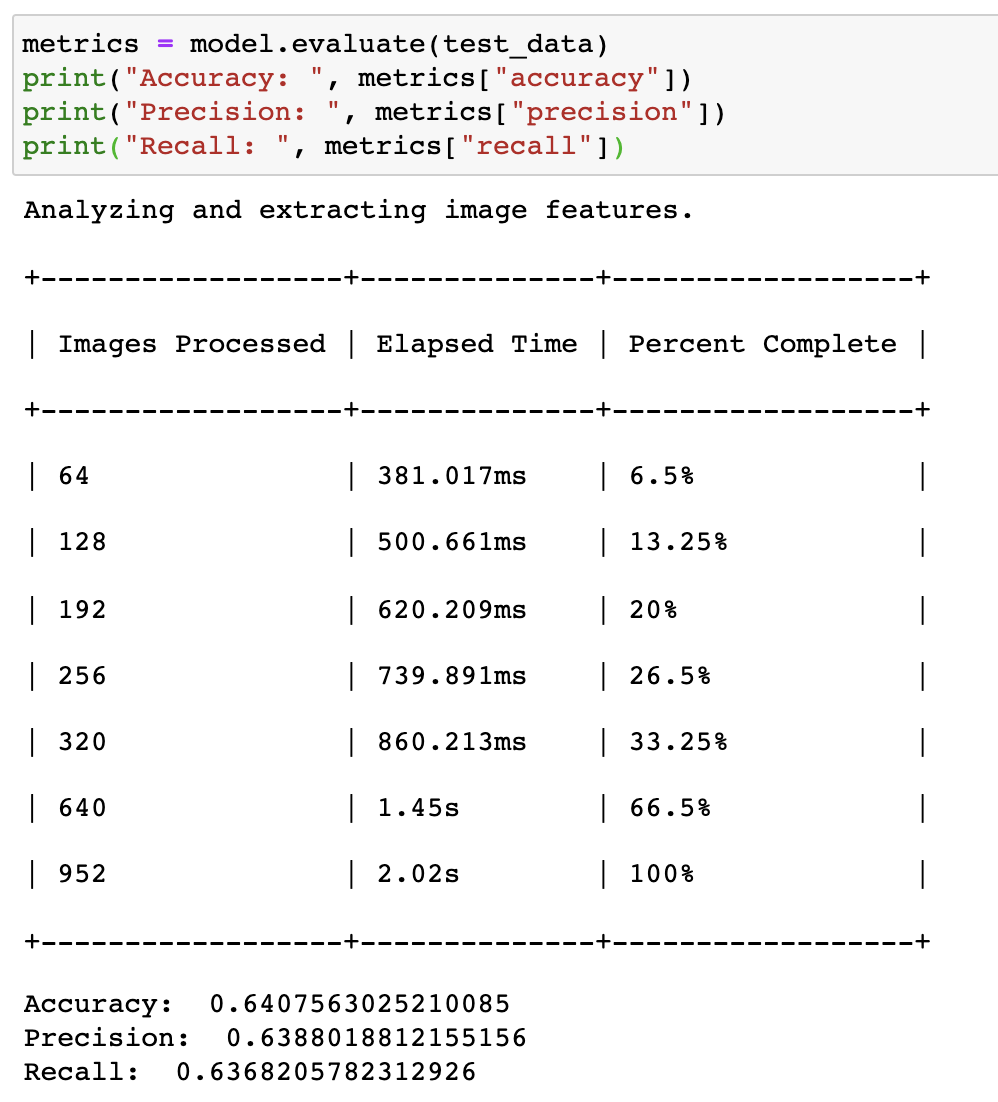
그 결과, Evaluating this model on the test dataset produces metrics around 65%, which is slightly higher than before:
-> iterations 의 수를 증가시키는 것은 조금 도움이 되었다.
이때 팁은,
For the best results, first train the model with too many iterations, and see at which iteration the validation accuracy starts to become worse. That’s your sweet spot. Now train again for exactly that many iterations and save the model.
* Confusing apples with oranges?
confision matrix plots the predicted classes versus the images’ real class labels, so you can see where the model tends to make its mistakes.
- target_label : shows the real class
- predicted_label : has the class that was predicted
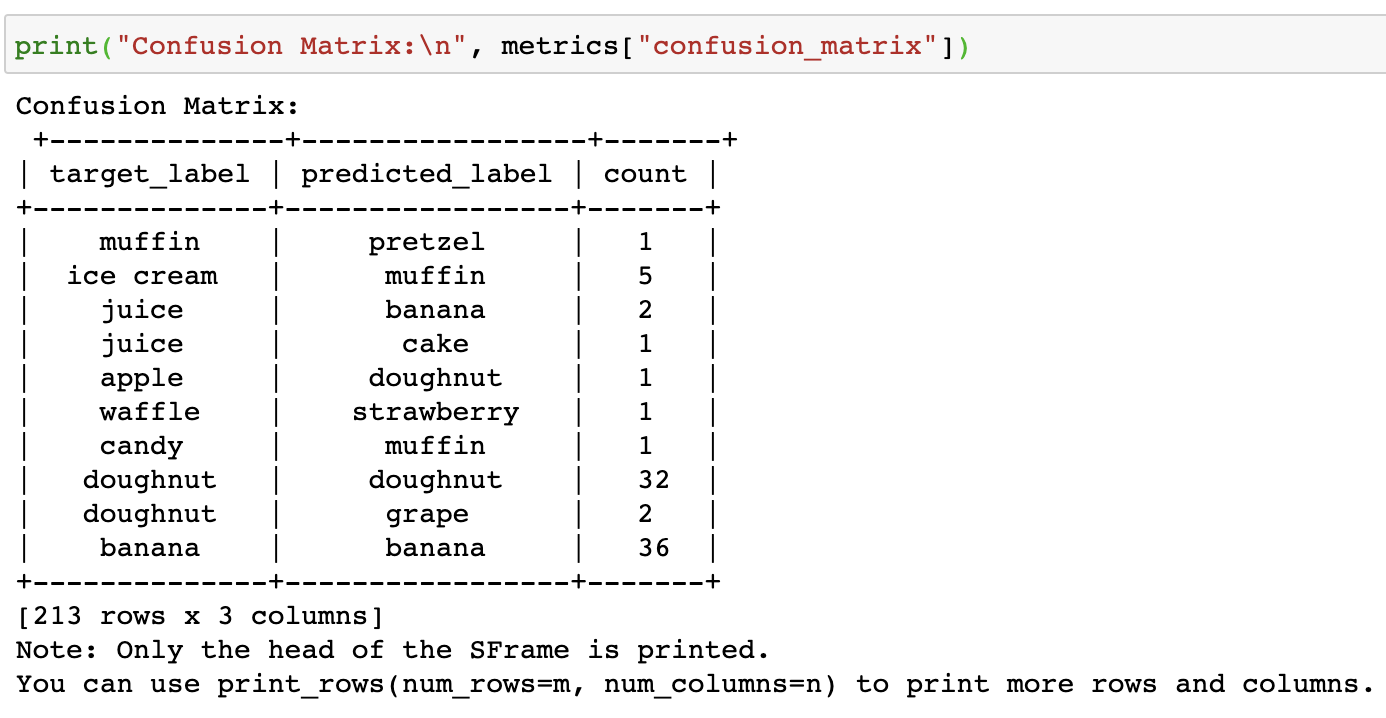
더 좋게 시각화 visualization 하기 위해서는 코드를 입력한다. 코드에는 2개의 함수가 있는데, 하나는 confusion matrix 를 계산하기 위해서고, 다른 하나는 그것을 그리기 위한 함수이다.
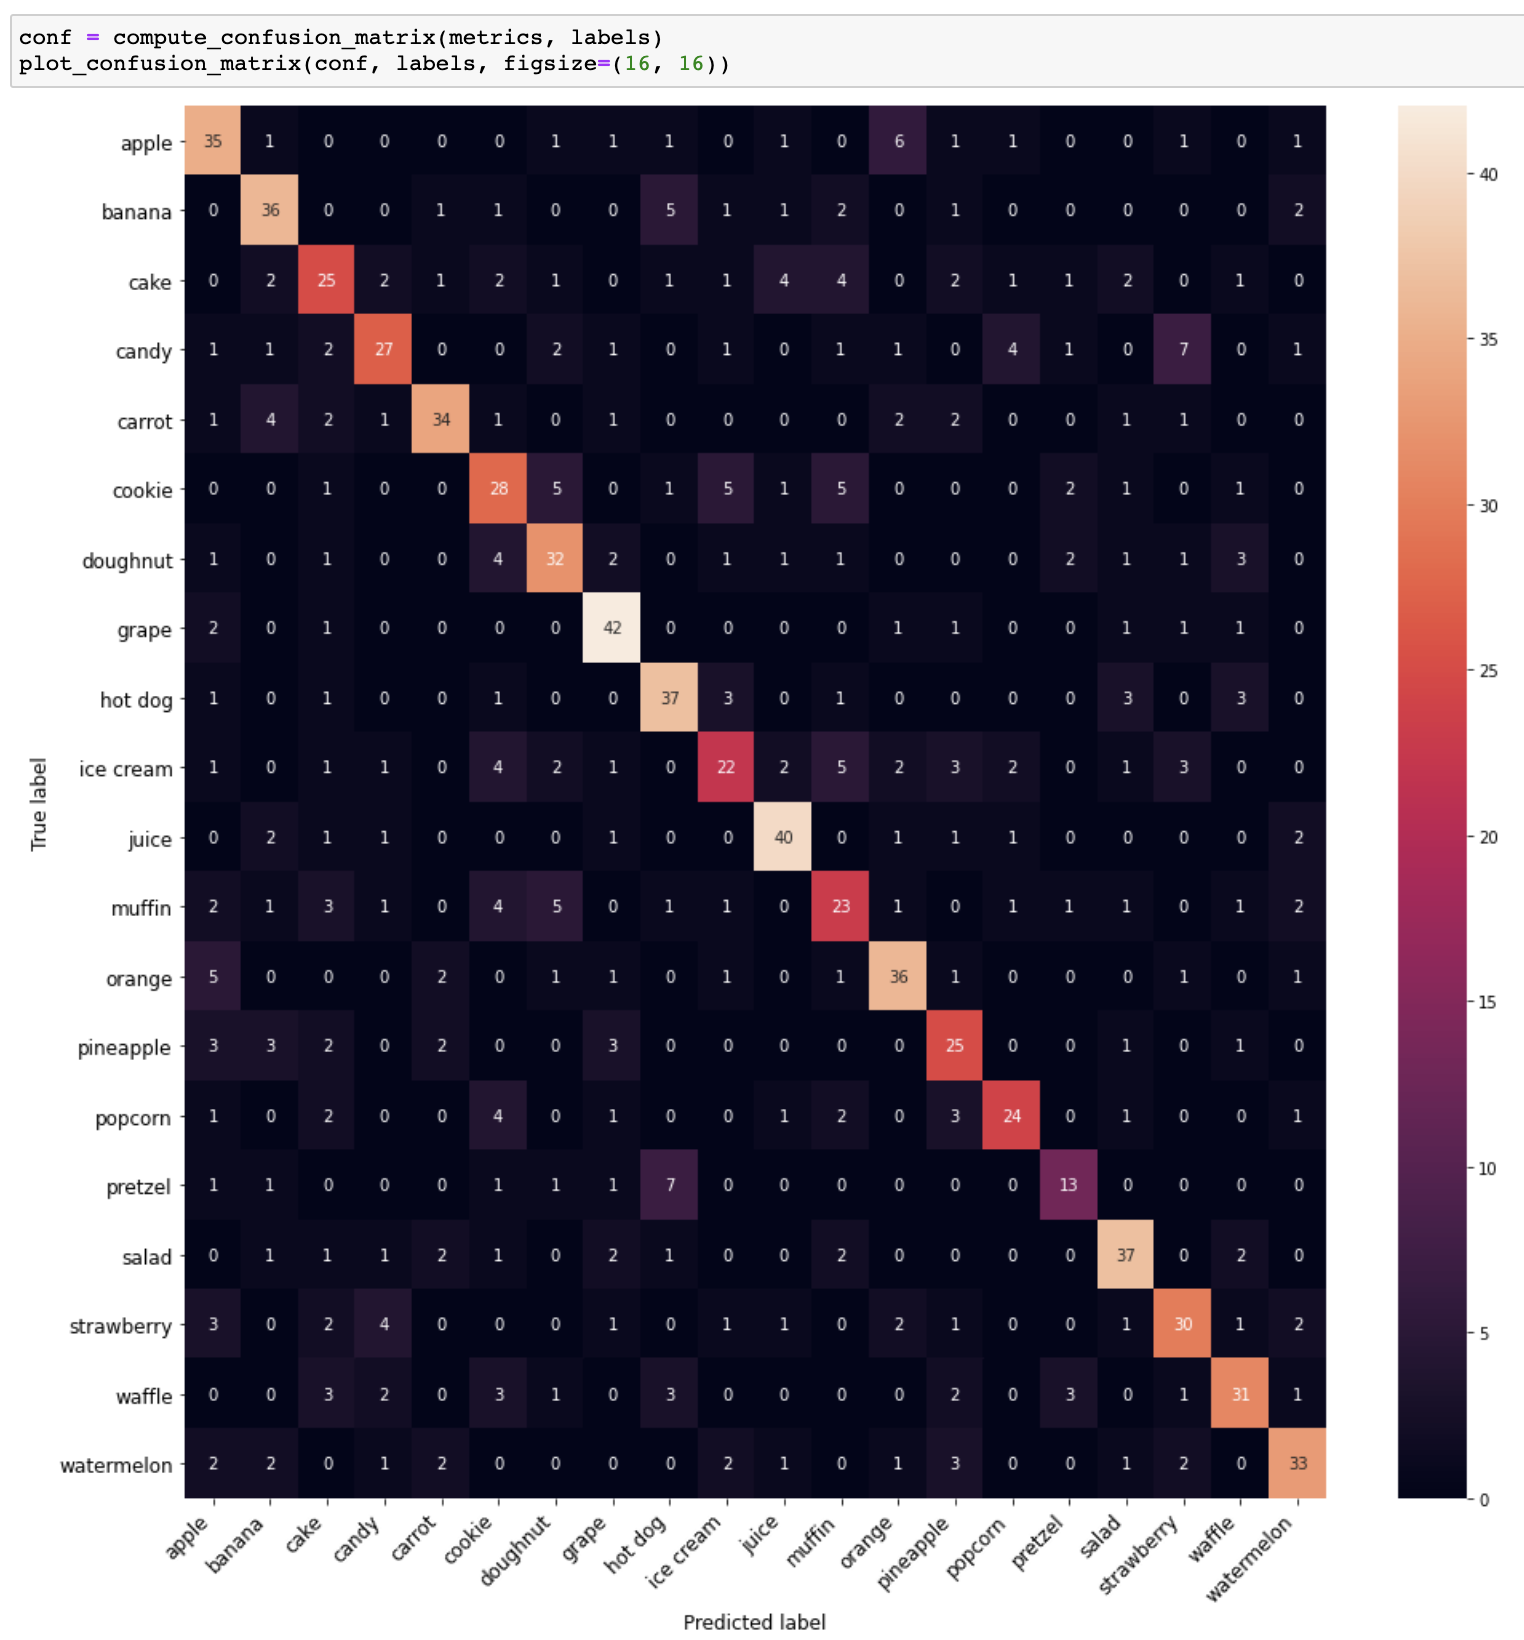
heatmap은 작은 값을 black and dark purple과 같은 cool한 색으로, 큰 값을 red to pink to white와 같은 hot colors로 표시한다.
In the confusion matrix, you expect to see a lot of high values on the diagonal, since these are the correct matches.
confusion matrix는 potential problem areas for the model을 보여줌으로 유용하다.
it’s clear the model has learned a great deal already, since the diagonal really stands out, but it’s still far from perfect.
Ideally, you want everything to be zero except the diagonal.
* Computing recall for each class
accuracy는 specific subsets of the dataset에 대해 더 큰 값을 가지거나 낮은 값을 가질 수 있다.
accuracies for the individual classes from the confusion matrix에 대해 알아보자.
For each row of the confidence matrix, the number on the diagonal is how many images in this class that the model predicted correctly. You’re dividing this number by the sum over that row, which is the total number of test images in that class.
This gives you the percentage of each class that the model classified correctly. This the recall metric for each class:
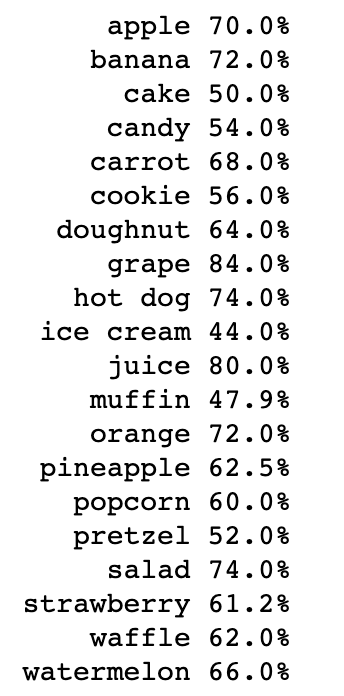
여기에서 best classed란 84% grage, 74% hot dog 이다.
worst performing란 44% ice cream, 47.9% muffin 등이다. 모델을 improve하기 위해서는 이러한 클레스에 관심을 가져야 한다.
* Training the classifier with regularization
Regularization 정규화는 overfitting을 방지하기 위해 돕는다. 우리 모델에서 overfitting이 issue가 되는 것 같으니 정규화를 진행해보자.
진행 방법?
You’ve added three additional arguments: l2_penalty, l1_penalty and convergence_threshold. Setting the convergence_threshold to a very small value means that the training won’t stop until it has done all 200 iterations.
l2_penalty and l1_penalty are hyperparameters that add regularization to reduce overfitting.
여기서 정규화란?
Recall that a model learns parameters — also called weights or coefficients — for combining feature values, to maximize how many training data items it classifies correctly. Overfitting can happen when the model gives too much weight to some features, by giving them very large coefficients. Setting l2_penalty greater than 0 penalizes large coefficients, encouraging the model to learn smaller coefficients. Higher values of l2_penalty reduce the size of coefficients, but can also reduce the training accuracy.
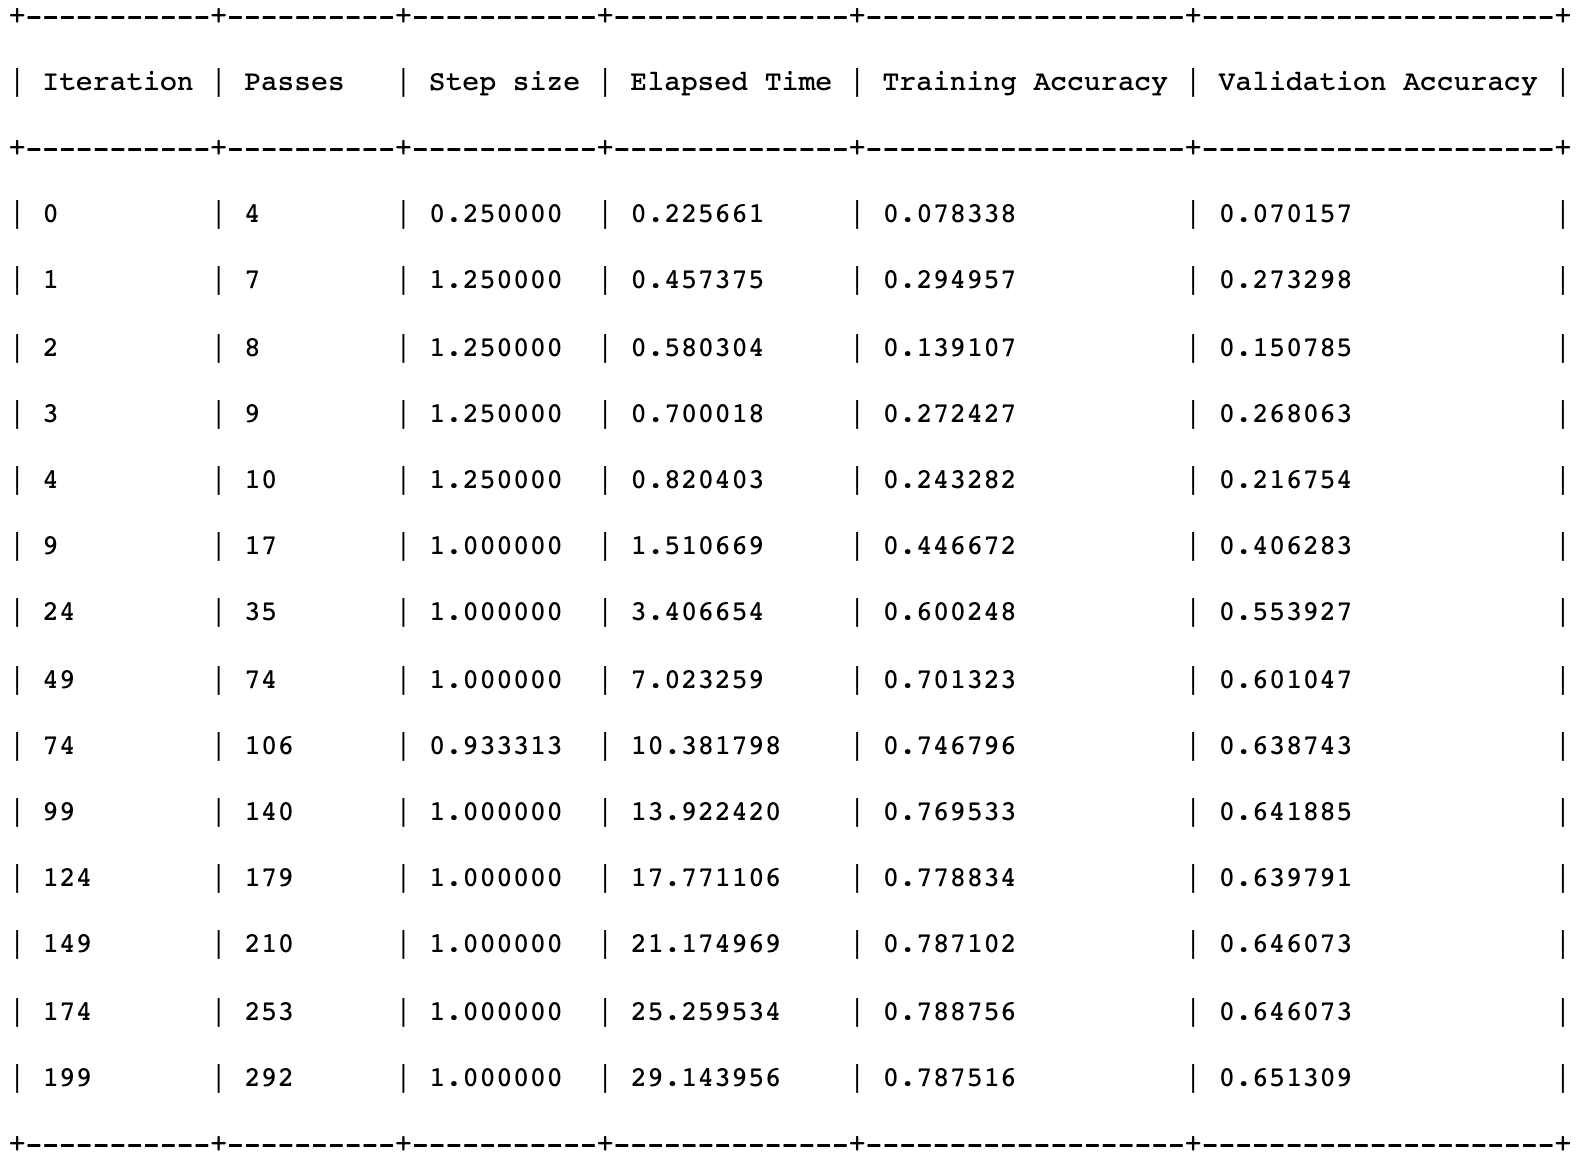
The training accuracy doesn’t race off to 100% anymore but tops out at about 79%.
More importantly, the validation accuracy doesn’t become worse with more iterations.
It is typical for the training accuracy to be higher than the validation accuracy.
Is l2_penalty=10.0 the best possible setting?
To find out, you can train the classifier several times, trying out different values for l2_penalty and l1_penalty. This is called hyperparameter tuning.
training procedure를 위해 올바른 hyperparameters를 찾는것은 model의 quality에 큰 영향을 미칠 수 있다.
validation accuracy는 이런 hyperparameters의 효과를 표시하는데 도움을 준다.
Unfortunately, every time you train the model, Turi Create has to extract the features from all the training and validation images again, over and over and over. That makes hyperparameter tuning a very slow affair. Let’s fix that!
* Wrangling Turi Create code curtain
Turi Create의 장점은 SFrame에 data가 있으면 한줄의 코드로 모델을 train 할 수 있다는 것이다.
단점은 Turi Create API가 training process에 제한된 control을 준다는 것이다.
* Saving the extracted features
이제 how to save the intermediate SFrame to disk, and reload it, just before expermenting with the classifier 방법에 대해 알아보자.
우선, pre-trained SqueezeNet model을 load하고 그 feature extractor를 grab한다.
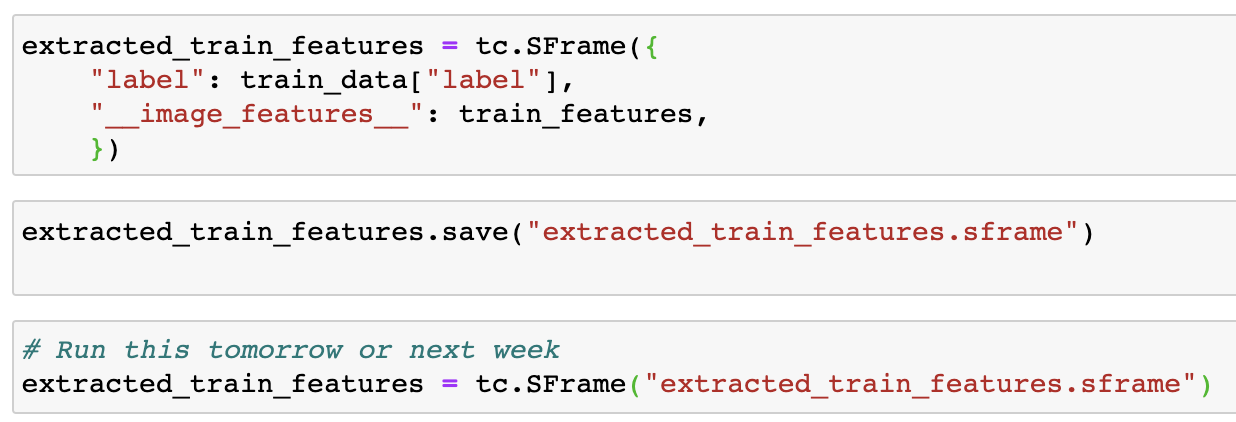
You’re using the MXFeatureExtractor object to extract the SqueezeNet features from the training dataset. This is the operation that took the most time when you ran tc.image_classifier.create(). By running this separately now, you won’t have wait for feature extraction every time you want to train the classifier.
Here, you’re just combining the features of each image with its respective label into a new SFrame. This is worth saving for later use! Enter and run this code statement:
* Inspecting the extracted features
features 에 대해 살펴보자.
Each row has the extracted features for one training image.
The __image_features__ column contains a list with numbers, while the label column has the corresponding class name for this row.
a feature vector looks like : they are features that SqueezeNet has determined to be important — how long, round, square, orange, etc. the objects are.
In the same way, extract the features for the images from the validation dataset, and save this SFrame to a file too:

* Training the classifier
* Saving the model
* A peek behind the curtain
* Key points
-
In this chapter, you’ve gotten a taste of training your own Core ML model with Turi Create. In fact, this is exactly how the models were trained that you used in chapter 2, “Getting Started with Image Classification”.
-
Turi Create is pretty easy to use, especially from a Jupyter notebook. It only requires a little bit of Python code. However, we weren’t able to create a super accurate model. This is partly due to the limited dataset.
-
More images is better. We use 4,800 images, but 48,000 would have been better, and 4.8 million would have been even better. However, there is a real cost associated with finding and annotating training images, and for most projects, a few hundred images or at most a few thousand images per class may be all you can afford. Use what you’ve got — you can always retrain the model at a later date once you’ve collected more training data. Data is king in machine learning, and who has the most of it usually ends up with a better model.
-
Another reason why Turi Create’s model wasn’t super is that SqueezeNet is a small feature extractor, which makes it fast and memory-friendly, but this also comes with a cost: It’s not as accurate as bigger models. But it’s not just SqueezeNet’s fault — instead of training a basic logistic regression on top of SqueezeNet’s extracted features, it’s possible to create more powerful classifiers too.
- Turi Create lets you tweak a few hyperparameters. With regularization, we can get a grip on the overfitting. However, Turi Create does not allow us to fine-tune the feature extractor or use data augmentation. Those are more advanced features, and they result in slower training times, but also in better models.
In the next chapter, we’ll look at fixing all of these issues when we train our image classifier again, but this time using Keras. You’ll also learn more about what all the building blocks are in these neural networks, and why we use them in the first place.
* 영 단어 사전
- tweaking : 조정
- indication : 표시
* 참고하면 좋을 사이트 : 머신러닝 용어집
https://developers.google.com/machine-learning/glossary?hl=ko
머신러닝 용어집 | Google Developers
머신러닝 용어 정의
developers.google.com
'IT 지식 기록 > ML for iOS | 인공지능' 카테고리의 다른 글
| Chapter 6: Taking Control of Training with Keras (0) | 2020.08.03 |
|---|---|
| 되돌아보는 챕터 5 (0) | 2020.07.28 |
| 되돌아보는 챕터 3,4 (0) | 2020.07.21 |
| Chapter 3: Training the Image Classifier _ 예제 결과 공유 (0) | 2020.07.20 |
| Mac 아나콘다 Command Line 코드로 설치 (0) | 2020.07.20 |


